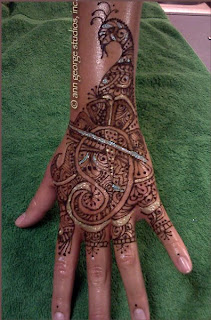
 I feel very happy with this tattoo design. I used the "sketching" technique I learned from the fabulous video previously posted to draw out the main components for this pattern.
I remembered to outline the primary design as soon as I drew it so that I would not be dazzled by the detail & forget to create the white space in process. You will see that the gilded nicely fills those "white space" areas in this photo.
If you want a closer look, just click the photo for more details. My client was very happy with her pattern, and enjoyed the process of watching the sketched outline be filled in with various traditional henna components.
I started the pattern fartest from the finger tips & worked my way down the hand. If you look, you can see that the paisley, floral component & peacock head stand out in this pattern as they are surrounded by space.
Now.. for all or you experienced artists, I am sure these tips are not news at all. I am however, spatially dyslexic & needed this kind of obvious "how to" to progress in the art form.
Well that's all for now! Namaste.
You have read this article back of hand tattoo /
gilded henna tattoo /
henna tips /
peacock henna tattoo
with the title Gilded Henna Tattoo - The Peacock in Turquoise. You can bookmark this page URL http://blogarttattoo.blogspot.com/2008/07/gilded-henna-tattoo-peacock-in.html. Thanks!


